 Skip to content
The most iconic calisthenics exercises
When you’ve been doing calisthenics for a while, it’s really fun to try out some advanced calisthenics exercises! Because many static gymnastics exercises are recognizable from gymnastics, the names are often the same. Yet in practice we see that the implementation is often done differently, whereby the use of rings in calisthenics is less common.
On this page we have listed the most famous calisthenics exercises for advanced users. Are there any exercises that you already can do?
Handstand
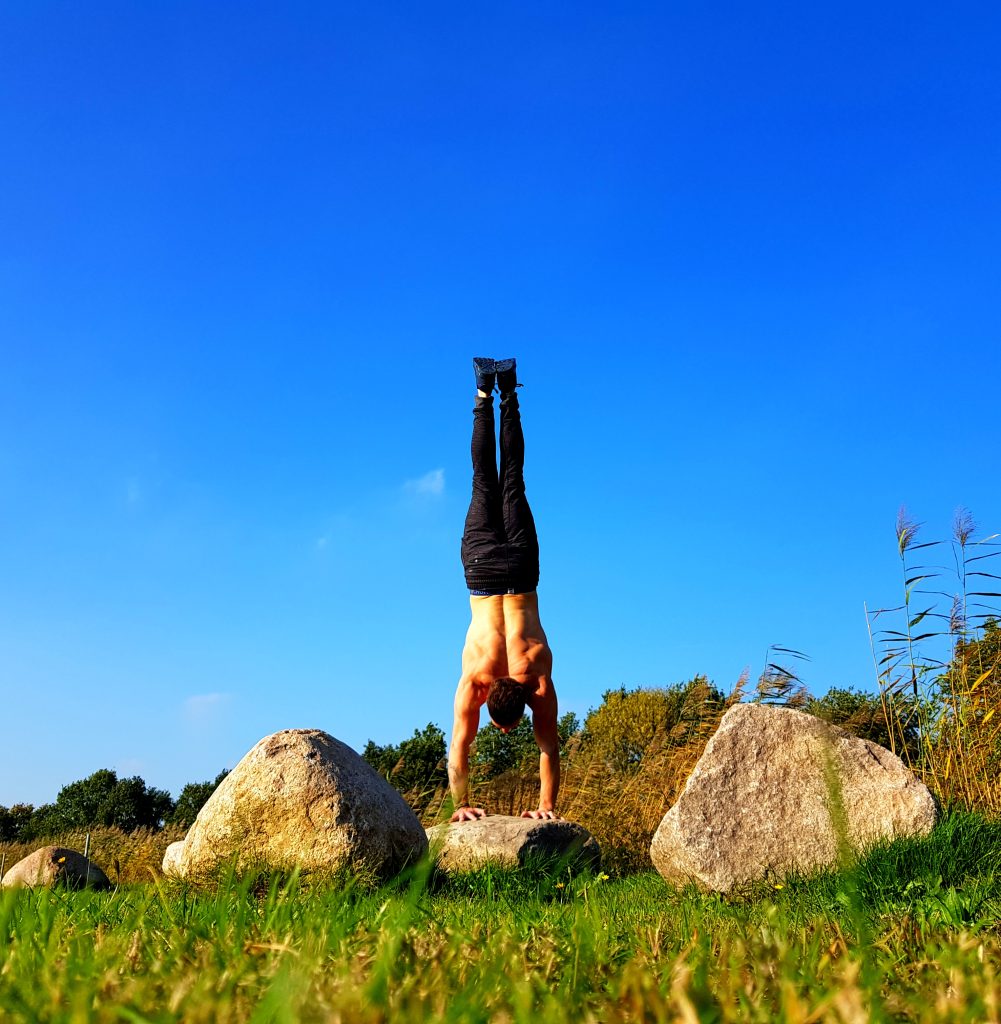
One of the most famous calisthenics exercises that you can learn relatively quickly is the handstand. With the handstand you mainly need good mobility in your wrists and shoulders, in addition it is crucial not to be afraid of falling over. The handstand is a technical exercise that requires some strength in the shoulders, although with enough flexibility in your shoulders you should be able to do it quite fast!
How to learn a Handstand
Learning a handstand against the wall is the first best thing you can practice to get comfortable with being upside down. Your body has to pump the blood completely the other way around, which can quickly put pressure on your head. Breathing is the key to being able to keep this up for longer. To balance in the handstand is the next challenge. From your fingers to your shoulders to your hips and knees, you need to control the position of your body to maintain balance. The handstand is a wonderful exercise with many variations.
Once you master balancing in the handstand, you will be able to stand on your hands anytime and anywhere, which of course creates the opportunity for spectacular photos! To quickly learn a handstand, we recommend that you start with the Frog stance (found on our page: Basic Calisthenics exercises), and you can also start practicing with the handstand against the wall. When you can do these two easily, it is important to learn how to balance yourself with your fingertips and shoulders. Try to find the balance from the handstand against the wall so that you don’t keep falling over. When you can hold the balance at the wall apart from the wall, it’s time to start practicing without the wall.
It can take 100 to 1000 attempts before you succeed, but the handstand can be learned quite easy for everyone with 2-4 weeks of active practice. When after many attempts and the above tips you still fail to balance, or do you simply want more information, tips and complete trainingroutines for the handstand? Check out our online workshop: ”Unlock the Handstand”, which can be found on the Productions page.
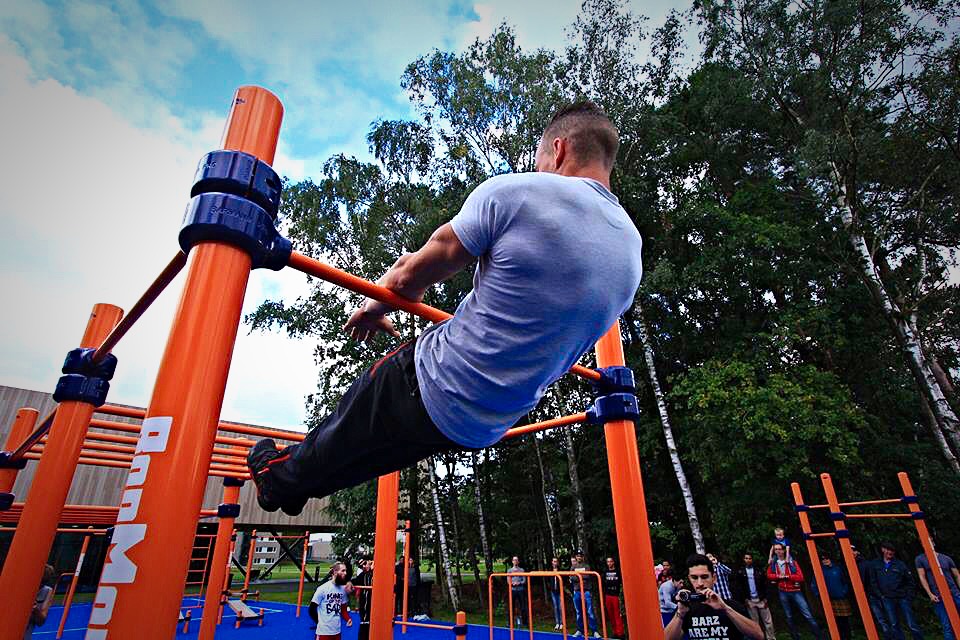
Muscle-up
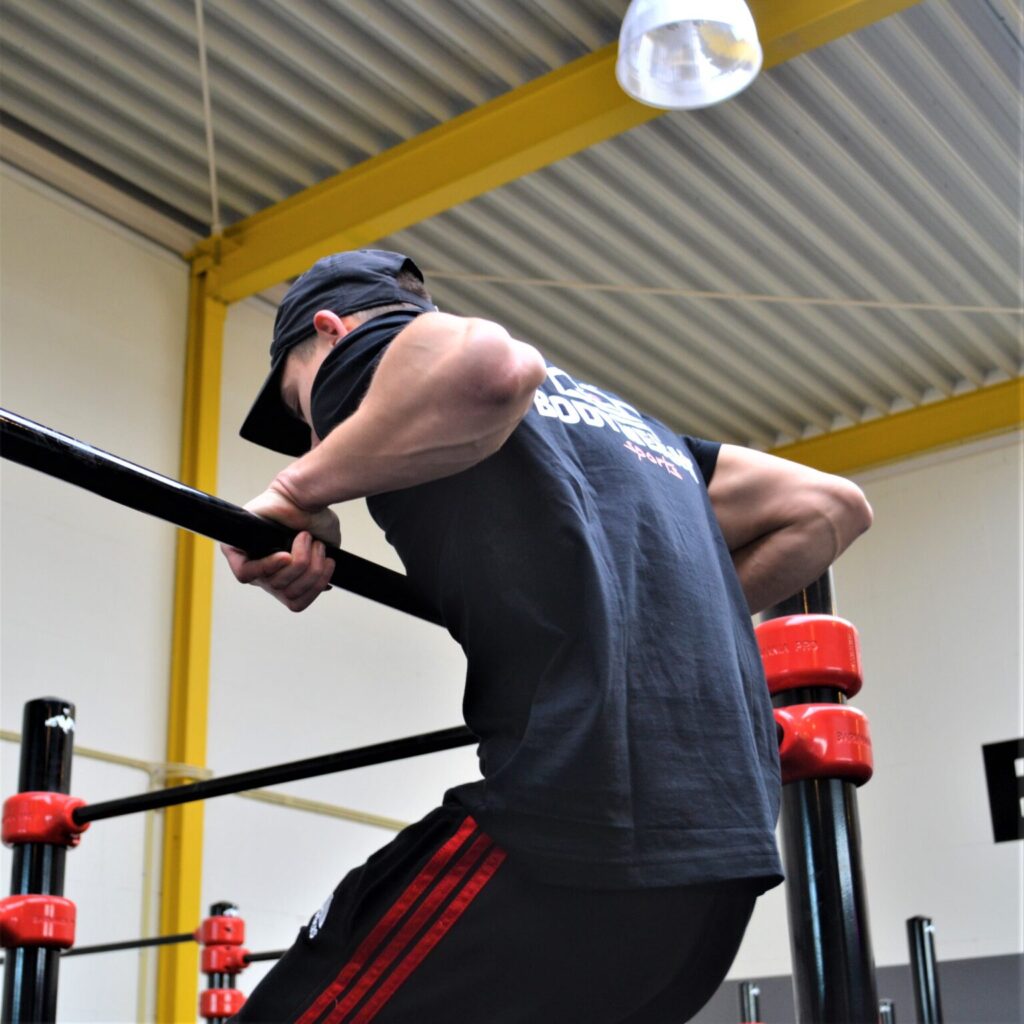
Probably the most sought-after calisthenics exercise for intermediate practitioners is the muscle-up. The muscle-up is known as the best exercise of all to train your entire upper body, without using weights. With a muscle-up you train your wing muscles, back muscles, shoulders, chest muscles, arms, hands and even abs. it is no coincidence that the muscle-up is so effective! Everyone who manages a muscle-up for the first time experiences a fantastic feeling, because you have proven to yourself that after hard training you will reach your goals. Every time someone does the muscle-up for the first time, there are screams and cheers of joy. From now on you can use the most effective exercise of all in your workouts!
How to learn a Muscle-up
To learn a muscle-up, you must master basic exercises such as pull-ups, dips and push-ups. Then you can start working on the explosiveness of these exercises. For example, by doing pull-ups where you briefly lift your hands from the bar at the top, you will pull up faster and higher. These pull-ups are called plyometric pull-ups. With Push-ups you can do exactly the same, lift your hands from the ground at the top or with a clap in the air. In addition, you can practice a jumping version of the Muscle-up at a lower bar, by imitating the movement of the muscle-up, your body will learn how this feels and develop the muscles for it. When you succeed, you can use an increasingly higher bar to practice a jumping muscle-up. This way you get closer and closer to the real muscle-up.
You can also train muscle-ups with resistance bands, so you can perform the entire exercise and maybe even do several repetitions. Breathing is also very important with a muscle-up, we recommend blowing out with the upward movement, and inhaling with the downward movement. This way you can take a full breath with every muscle-up, giving your body the oxygen it needs. Learning a muscle-up can take a long time, but with good motivation and training, enough rest and a healthy body weight, anyone can learn it. If after a lot of practice it still doesn’t work, you can consider following our ”Unlock the Muscle-up” online workshop for the most effective training schedules and tips so that you will definitely learn it.
Pistol squat
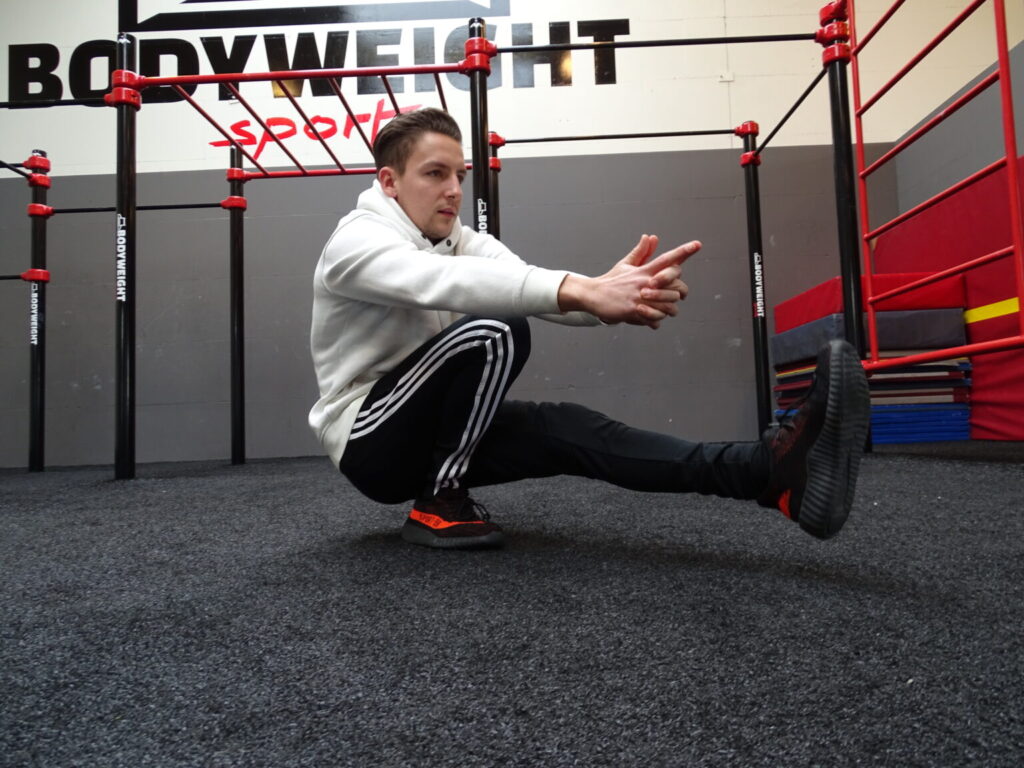
A pistol squat is a one-legged squat, where the position of the hands gives this exercise its signature name! With the pistol squat, your entire body weight is on one of your legs. If you’ve never tried this before it will look relatively easy but make no mistake, it requires quite a bit of force to push yourself up with just one leg.
The pistol squat is a well-known strength exercise for your legs on body weight and when you can perform it a number of times in a row, it is a fact that your legs are strong. To learn this exercise you can try it (after some warm-up) first. Many athletes have limited ankle mobility, which means that they often fall backwards when performing the pistol squat. It is the goal that your heel remains on the ground.
How to learn a Pistol squat
A good start is to support yourself with a pole or bar to perform the exercise correctly, you will already notice that the pistol squat is more difficult than it seems. When you have enough strength in your legs to push your entire body up with one leg several times in a row, the ankle mobility can still cause some limitation. It is then important to make it more flexible by simply leaning back a bit more in the squatting position, you can also pull yourself forward on a fixed object during a low squat. The downward dog pose from yoga is also a good exercise for this.
To make your first pistol squat successful, it helps to hold a weight of, for example, 2.5 kg or 5 kg in your hands for the counterweight. In addition, you can also perform the pistol squat more easily on a slightly sloping surface (the lowest side facing forward). By strengthening your legs and improving ankle mobility, it should be possible for everyone to learn pistol squats!
Dragonflag
The dragon flag is perhaps the most effective calisthenics exercise for your abdominals & core! Because you have to put a huge amount of tension on your entire body, the dragon flag requires a lot of energy and because of the many muscles you need for this, dragon flags belong in every good calisthenics training. With a dragon flag you hold your hands on a pole, keeping your head a little bit away from it. With your hands you want to hold the pole as low as possible and keep your elbows closed. Then it is the intention to lower from above with a fully stretched body to the ground and back again.
How to learn a dragonflag
To learn a dragon flag it is best to start with Leg raises (basic exercise) but with your hands already on the pole. By lifting your hip during the upward movement, you can reach the top of the starting position of the dragon flag. These (pole) Leg raises are very effective to get your abs, core and arm muscles working together in preparation for the dragon flag. When you try a dragon flag, you can also do this with one leg pulled in first, put one of your feet on the inside of your knee and you may already be able to perform the dragon flag!
Two important points of attention for the dragon flag are that you should try not to pull yourself towards the pole, but rather use the force to pull the pole out of the ground. It is also an important point to ensure that you stretch your hip and knees properly (in the one-leg variant only one side) and that you do not touch the ground with your buttocks at the bottom of the dragon flag. When the dragon flag is no longer difficult for you, you could make it twice as heavy for your arms by performing it with one arm, which suddenly makes the exercise very challenging again!
Another difficult variant is the straight-arm dragon flags, where you need to have a horizontal bar at a height of about 20-30 cm at your disposal where you can support yourself with fully stretched arms underneath. When you do dragon flags with straight arms, you trade the load on your triceps muscles for your wing muscles. The dragon flag and the straight-arm dragon flag are one of the best exercises to build strength for a frontlever.
Frontlever
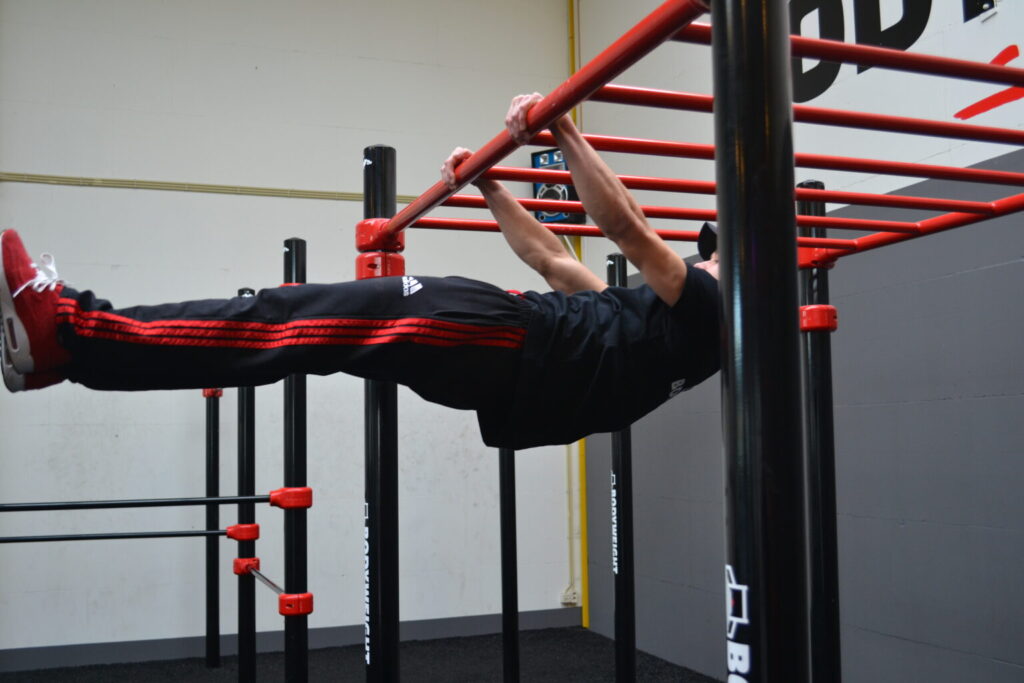
A truly iconic advanced calisthenics exercise is the frontlever. The frontlever looks simple but it is absolutely not! Because virtually every muscle in your body has to work together to maintain this static posture, it takes most athletes between 6 months and 2 years to learn the frontlever. With a frontlever, you keep your whole body horizontal with your arms fully extended. Because your back muscles are the pivot point, most of the weight comes on here, you also have to keep your body straight with the entire front of your body (mainly abdomen, hip and thighs).
How to learn a Frontlever
To learn a frontlever, we recommend that you start with the Skin-the-cat exercise (basic technical exercise), where you want to perform it with straight arms. If this is successful you can try to hold the tucked frontlever. With the tucked front lever you hang with your upper body exactly the same as the normal front lever, only with this you still have both knees tucked.
When you can hold the tucked frontlever well, you can try to do the frontlever with one leg straight, and then go to the full frontlever. It can be very helpful to also train the upward movement of the front lever, called frontlever raises. Here you move your body (possibly with a resistance band) with stretched arms towards the frontlever, this way you can train the frontlever in a dynamic way and with repetitions. You can also practice the frontlever raises with one leg straight and the other pulled in.
The most important thing here is that you keep your arms and body completely straight to effectively progress with this difficult exercise. You can perform the frontlever everywhere when theres a bar, which makes it great to shoot spectacular photos! When the normal frontlever is easy for you, you can start training for a front lever with other grips (for example, wide, small or supinated) or for frontlever pull-ups. One of the most difficult variants is the 1-arm front lever, where you perform the entire exercise with only one arm! The frontlever is a very cool calisthenics exercise from which you can clearly see what level a calisthenics practitioner has. The frontlever requires a lot of discipline and perseverance and this exercise is also a very good way to strengthen the victorian and dragonflags.
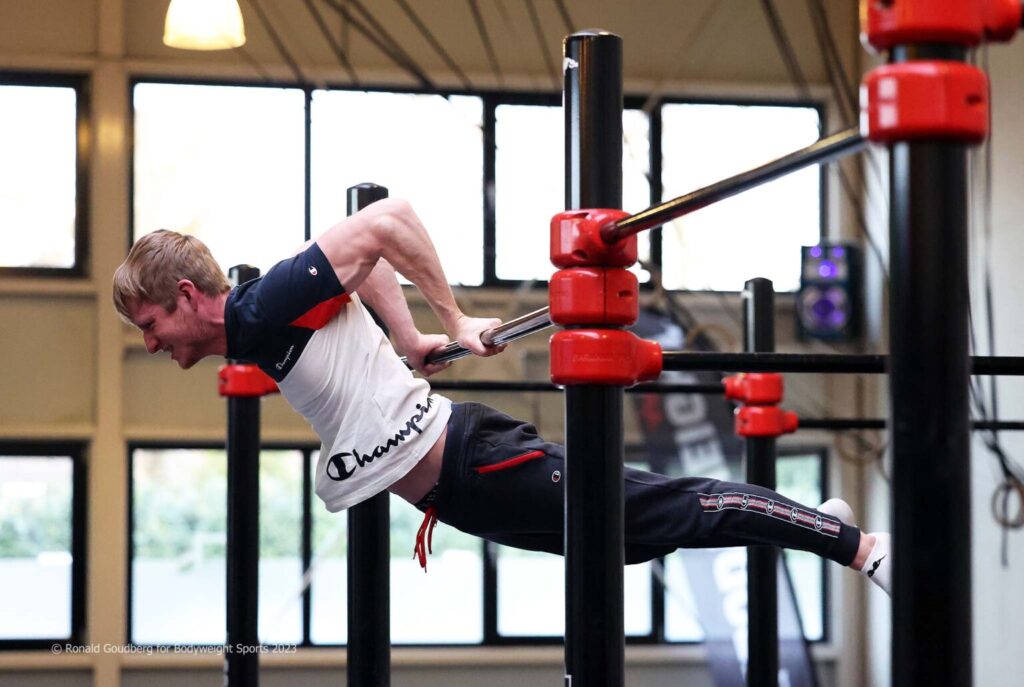
Victorian
The victorian is a very cool static pose for the advanced athletes. The exercise is somewhat similar to the frontlever and also works many of the same muscles, but the way of performing it is a bit different and is considered more difficult than the frontlever by many athletes. With a Victorian you often need your wing and back muscles, where you try to achieve a horizontal position with all the muscles at the front of your body.
The victorian is basically a high frontlever on your forearms, and in calisthenics is often done on a bar or between the dip bars. When an athlete performs the victorian between the dip bars, it is a bit more difficult than on a bar, due to the fact that the entire body can be lifted a little higher. An athlete who performs a victorian well between the dip bars will therefore be completely horizontal.
How to learn a Victorian
To learn a victorian it is smart to first get a good base with the frontlever and dragon flag. If you want to practice the victorian, you can try the different variants (on a bar and between the dip bars) with your legs tucked in (tucked) or with one leg stretched out. By doing your best a number of times per training to hold one of the forms of a Victorian, you will notice that it succeeds more and more after a few training sessions. In general, athletes who can perform a frontlever can also quickly learn a victorian. It is always good to vary your workouts and by regularly trying the victorian you will be able to unlock this exercise pretty quickly after a frontlever.
The victorian is a static posture that can be performed consecutively from many types of exercises. An athlete can also go from the victorian to different exercises, so you often see that a victorian is used in combinations of freestyle calisthenics. The Victorian is one of the exercises to work towards a reverse planche!
Backlever
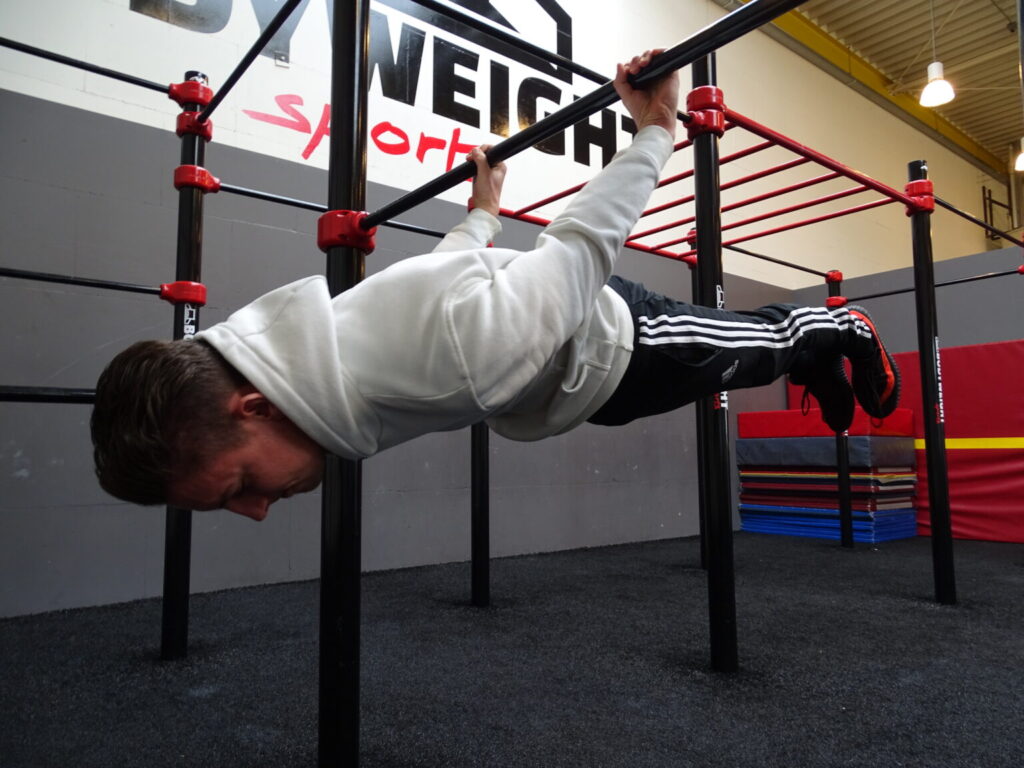
A well-known advanced calisthenics exercise is the backlever. The backlever, along with handstand, is often one of the first static advanced exercises an athlete learns. With a backlever, the athlete hangs from a bar or between the dip bars, and then assumes a horizontal position with the body facing downwards. The backlever demands a lot from your chest and shoulder muscles, with the entire back of your body having to keep everything straight. It is a cool exercise that is very impressive to see for many people.
How to learn a Backlever
To learn a backlever, it is a requirement to master the skin-the-cat (basic exercise) posture and movement. Your shoulder joint must have the mobility to get your back at least slightly further than horizontal during a skin-the-cat. When you succeed, you can safely practice the backlever, because it can be dangerous to hang the weight of your legs on a stretching shoulder. It is also very important to have your shoulders warm before you perform a backlever! If you want to practice the backlever you can hang upside down where you already fully straighten your body. With this ”vertical backlever” you are already hanging on the right side of the bar and you are already contracting many of the necessary muscles to do a backlever. From here you can slowly lower yourself with one leg straight to gradually increase the weight. When you slowly build up this ”negative backlever” movement in your workouts and try it regularly, you will notice that holding the backlever with one leg straight will succeed quite quickly. A common mistake when practicing the backlever is that the shoulders are pulled too far forward or the hand span at the bar is set too narrow. As a result, you clamp yourself with your wing muscles, as it were, which makes the backlever a lot easier and less beautiful and effective. The forward tilting (extension) of your hip is also an important point of attention for the backlever.
Backlevers can be made more difficult by varying the grip, a wide grip will make the exercise enormously heavier and a supinated grip (palms turned inward) also makes the exercise a lot more difficult and ensures that you have to engage other muscles. You can also train for backlever pull-ups, which demand a lot from your back and arm muscles, but of course look super cool. Ultimately, many calisthenics athletes have the goal of performing the backlever with just one arm. This variant is therefore at least twice as difficult!
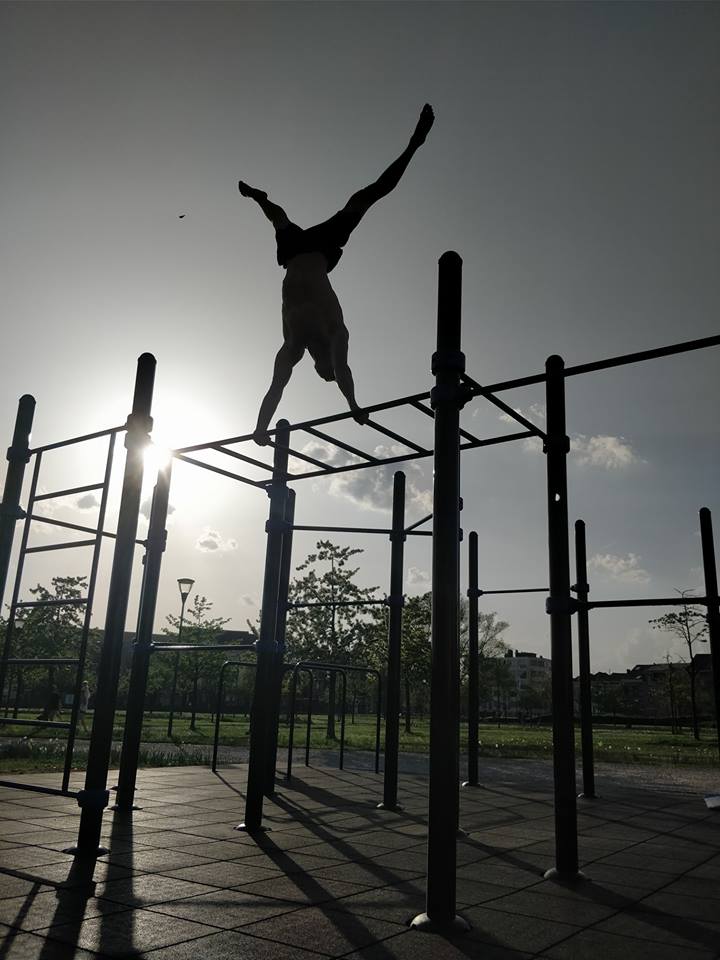
1-arm Handstand
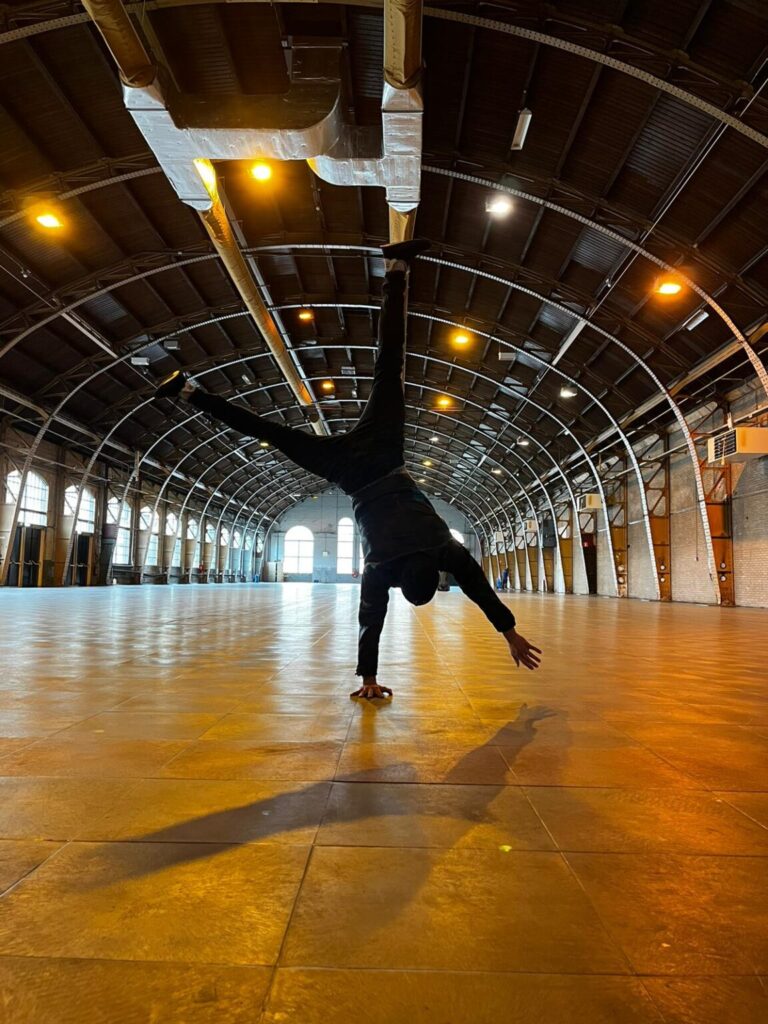
A real acrobatic calisthenics exercise for advanced practitioners is the 1-arm handstand. As the name suggests, you are balancing on one arm. The one-arm handstand is a very nice exercise that requires a lot of control and focus. In addition, it is an exercise that you can do literally anywhere, which makes it very cool to learn it. You can perform a 1-arm handstand on both your arms, making it actually two exercises to learn. Because there are so many different handstand variations, learning a 1-arm handstand is not only a lot of fun, but it significantly increases your opportunities to grow further in calisthenics.
How to learn a 1-arm Handstand
To learn a 1-arm handstand, it is first important to be able to do a good handstand on two arms. From here you can try to keep your legs open (straddle) and bend your torso to the side during a handstand against the wall. This way you will find your weight shifting to one arm allowing you to develop the strength to stand fully on one arm against the wall in a handstand. An important point for learning a 1-arm handstand is that you should push the shoulder of the arm you want to stand on as far as possible so that your weight is directly on top of your arm.
Because many people are somewhat limited in the mobility of their shoulder blades, practicing the 1-arm handstand can be extremely difficult. it often helps to improve the mobility of the shoulder during a regular handstand, so that this becomes easier to do with one arm. When you can stand against the wall on one arm in a handstand, you can also train freestanding for this fun exercise. In the same way as against the wall, shift your weight to one side, and stand on your fingertips with the other hand. By holding the handstand where you already have most of your weight on one arm and the other hand on your fingertips (or just 1 or 2 fingers), you will gradually increase your balance on one arm. The skill that makes the difference to balancing on one arm is that you can use your wrist to apply force not only from front to back, but also from side to side. You can perform a 1-arm handstand on the floor, paralettes or dip bars. When you practice these in different places, you will also learn to use different muscles to do a 1-arm handstand. This increases your control and you will notice progress faster. Yet most athletes always prefer the surface and even prefer an arm, which perfectly describes the variety and challenge of this exercise.
Human-flag
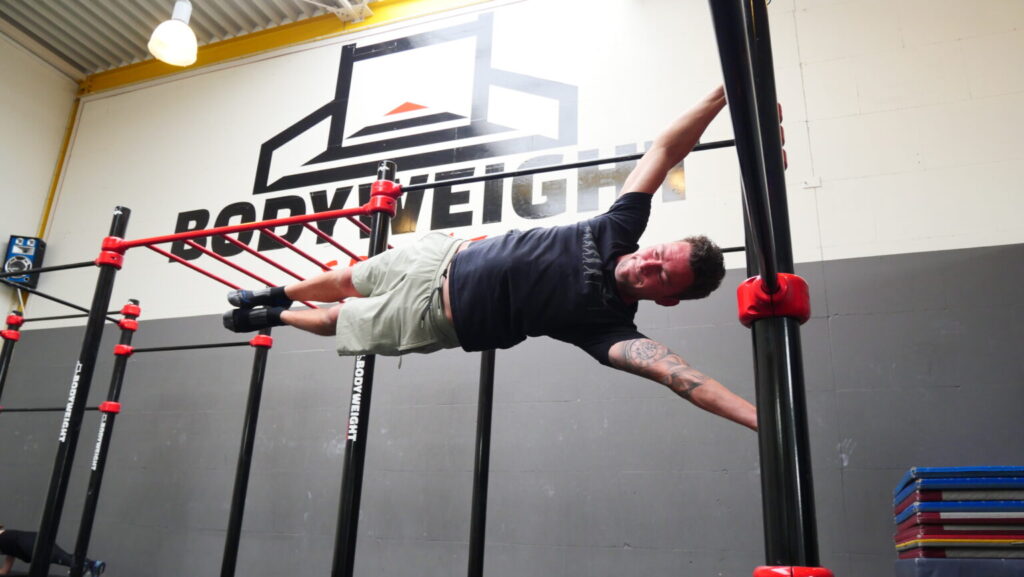
The most iconic of all advanced calisthenics exercises has to be the human flag. When you see someone hanging from a pole like a flag, you know for sure that you are dealing with a real calisthenics athlete. The human flag is a very difficult exercise and works almost every muscle in your body. Because the human flag can be performed on both sides, it is basically two exercises. The human flag can be performed on any vertical pole (not too thick) and also on two horizontal bars above each other. A human flag is a very cool exercise and will amaze everyone you meet! You perform the human flag by hanging sideways from a pole or bars, pushing with your lower arm, pulling with your upper arm and keeping everything straight with the entire side of your body. Keep your arms fully extended and your body horizontal. For a balanced human flag, we recommend keeping your arms at a 45-degree angle.
How to learn a Human-flag
To learn a human flag, you need a strong foundation for your shoulders and core muscles. We often recommend learning a solid set (6-8) of muscle-ups first and then the frontlever and the backlever. When you master these exercises well, you will be able to learn the human flag many times faster and safer. You can already practice in different ways, namely by performing the human flag with your feet still on the ground. This allows you to let your body understand which muscles it takes. Another good exercise for the human flag is ”straddle throws”, where you throw yourself into a human flag with your legs spreaded. As a result, you actually only have to throw one leg up and the other will only come loose a bit.
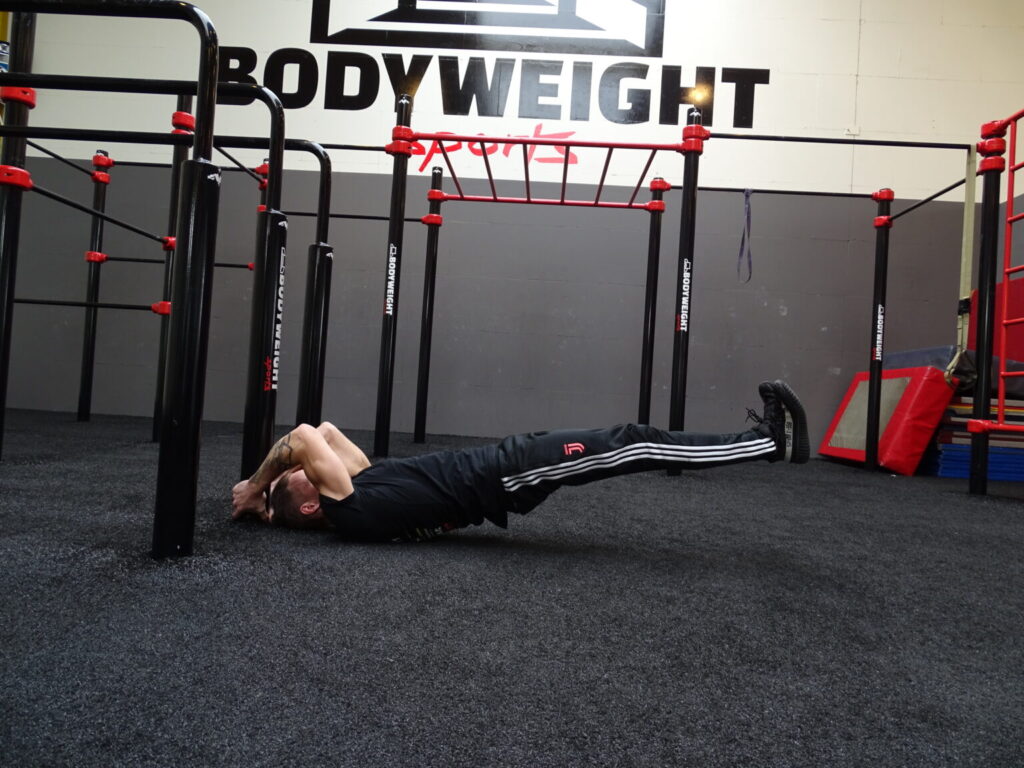
The main focus of a human flag is the lower shoulder. This should open properly so that the weight of your body is directly above it. When you try to hold the human flag with a collapsed shoulder, you can quickly injure your shoulder. For this reason alone, a strong shoulder is crucial for a smooth and safe progression with the human-flag. In addition, there is also a lot of tension on your spine, since an enormous weight is placed on it sideways.
Training lateral core exercises helps enormously in strengthening this. Exercises like the side plank, side plank hip raises, and side hanging knee raises can strengthen your core so you’ll eventually learn a human flag. The human flag is perhaps the most sought-after exercise among calisthenics practitioners simply because it looks so cool. If you want to make the human-flag more difficult, you can move your body up and down during the human-flag, this is called a human-flag raise. You can also train for human-flag pull-ups, where you do a pull-up with two arms at the same time while your body remains completely horizontal, extremely difficult!
Planche
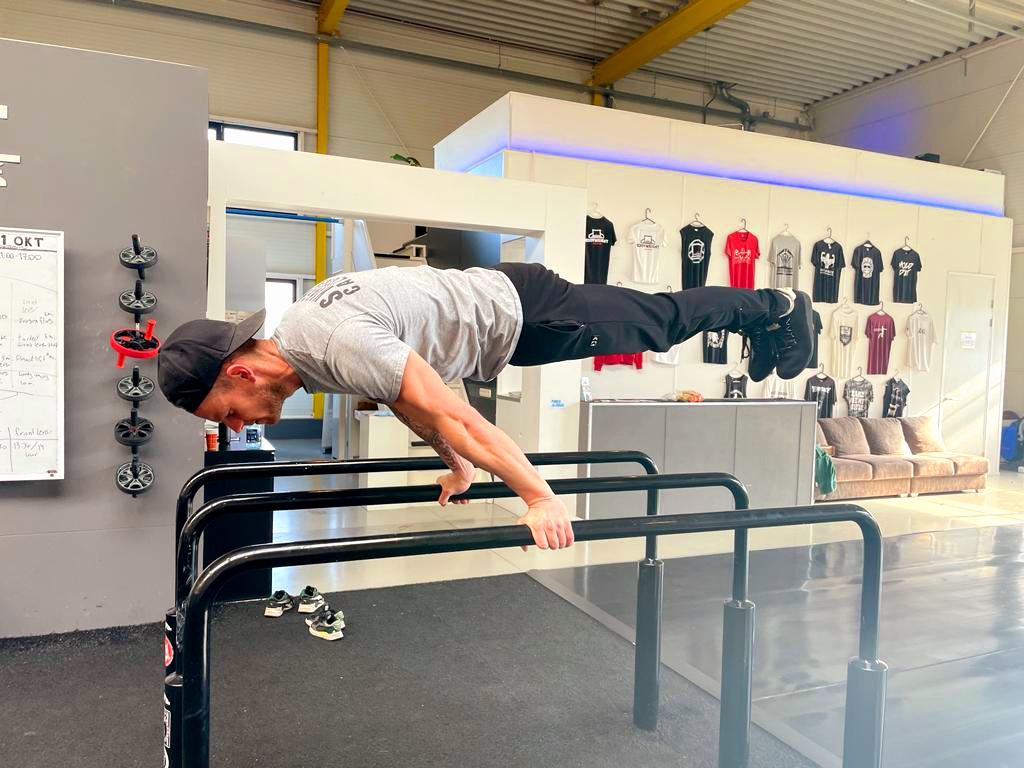
The planche is one of the more difficult static calisthenics exercises for advanced users and actually looks impossible. This exercise perfectly represents what is possible with calisthenics, giving you a good idea of the fantastic aspects that the sport has to offer. With a planche, your body is in a push-up position, but your legs are off the ground. The planche mainly appeals to the wrists, forearms, shoulders and back, although your entire body must be tense to hold the planche. It is a wonderful exercise that requires a lot of discipline and training to learn. You can perform the planche on the ground, a bar, paralettes and the dip bars, where a planche on the ground and a bar is the most difficult variant for many athletes.
How to learn a planche
To learn a planche, the most important basic exercises are a stable handstand and strong push-ups. Furthermore, we always recommend learning muscle-ups before anyone starts the planche. As a result, your wrists and shoulders are already trained so that you can make a safe start and good progress. Your wrists need to be flexible to safely practice a planche, which is why we always recommend improving their mobility every workout.
A first good exercise is the float hold, where you push yourself off the ground with your knees still fully retracted. When this succeeds, you can try to stretch your arms and focus on your shoulder blades. The basis of a good planche is to push your shoulder blades forward. By extending your shoulders in a push-up position, for example, you are already progressing in the most important aspect of the planche. When you can hold the float hold with arms straight, you can try to stretch your hip a little bit. If your knees are in line with your elbows, while you are off the ground and your arms straight, we call this a tucked planche. From here you can continue practicing. With a tucked planche you can practice for a straddle planche (legs straight and open). For this you can stand in a push-up position with your arms fully extended, push your shoulders well out and open your legs. Now try to push your hip forward so that you get your glutes well tensed. From this position you can lean forward to increase the weight on your shoulders. We call this a (straddle) planche lean. You can also slowly try to stretch your legs from a tucked planche towards a straddle planche, this will also increase the weight on your arms and shoulders, allowing your body to experience the strength you want to develop. Ultimately, the so-called full planche is a planche with legs closed and stretched out.
It can sometimes take years for an athlete to master the full planche, but once he or she succeeds, the reward in pride and cool photos or videos is more than worth it! The planche can be made more difficult and different by changing the grip, for example to a narrow or wide grip, but also supinated (wrists turned inwards) or pronated (wrists turned outwards), in addition, the planche can also be performed on just a few fingers, which makes the challenge huge. well-known more difficult variants are planche push-ups (push-ups in a planche) and the planche press (pushing up from a planche to a handstand). as you can read, the challenge in the planche is gigantic, and we’re not even talking about a 1-arm planche!
Human-arrow
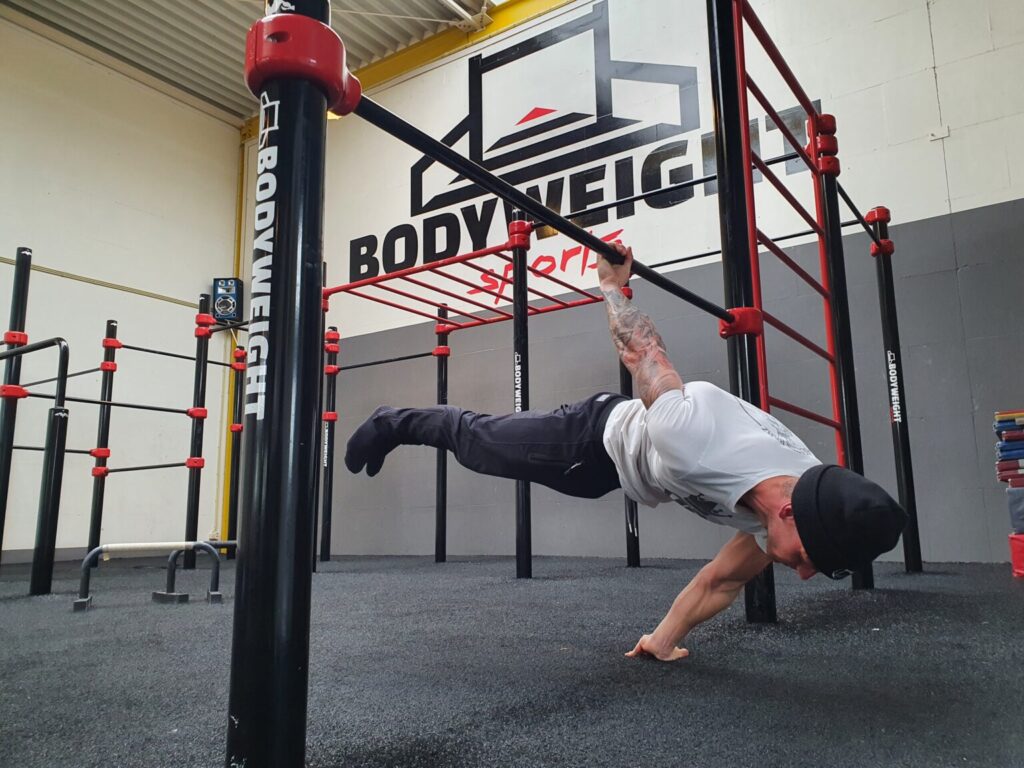
A somewhat lesser known advanced exercise in calisthenics is the human-arrow. A human-arrow, on the other hand, is a very cool and difficult static static hold, which can only be performed at a low bar or low dip bars. The human arrow is a combination of a backlever and a planche, with your body facing down with one arm on the bar and the other arm on the floor. In fact, you do half a backlever and half a planche, but the human arrow is easier than the planche, but for many athletes it is more difficult than the backlever. The exercise owes its name to the arrow shape that you create with your body.
How to learn a Human-arrow
To learn the human arrow, we recommend learning a backlever first. It is easiest to go from a backlever to a human arrow. When you hang from a low bar in a backlever, you can initially pull in your knees and then put one hand on the floor. When you can hold the tucked human arrow (with legs tucked), you can extend into a straddle human-arrow (legs straight and open). Eventually it will be possible to perform the human arrow with legs closed. Because this exercise can also be performed with the arms the other way around, there are also two variants to practice.
The cool thing about the human arrow, and what you often see calisthenics athletes do, is that it leads to a one-arm backlever (where the hand is suddenly lifted off the ground) or to a planche on the floor (where the hanging arm is suddenly placed on the floor). Due to the unexpected reasons for the exercise or follow-ups on the human arrow, this is again an amazing exercise that you do not encounter very often.
Maltese
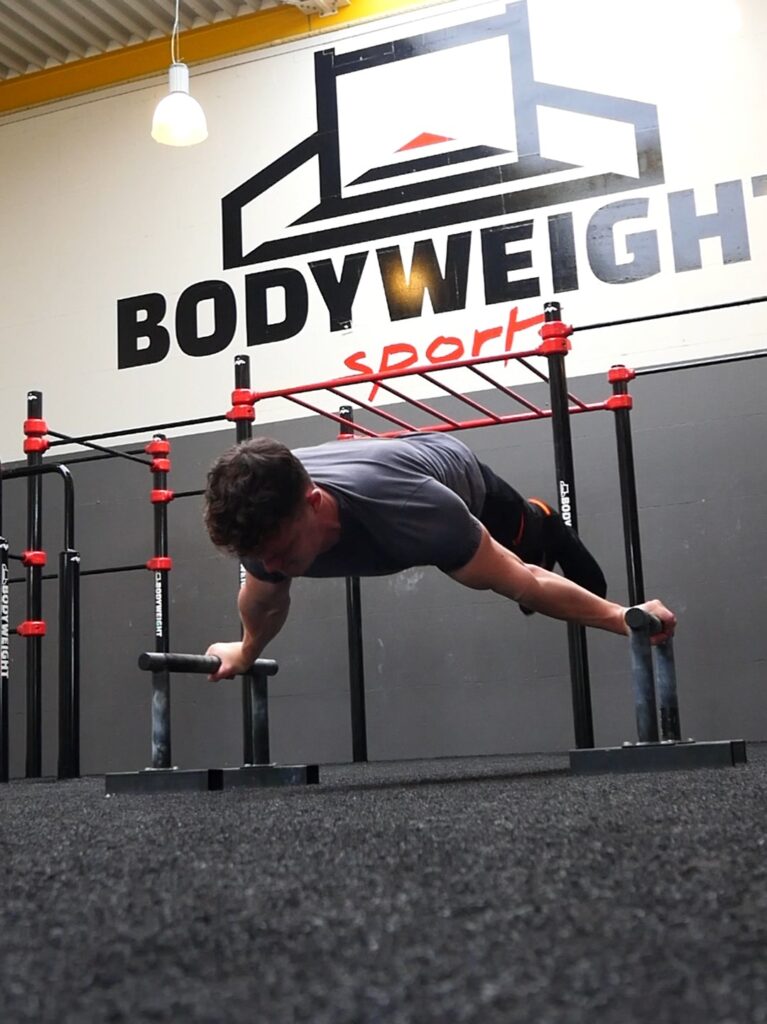
A static posture that is among the most difficult of all is the maltese. A maltese is basically a kind of planche, only with your body so low that your entire body and arms are in a horizontal line. The Maltese is sometimes also called the human-airplane, because your body takes the shape of an airplane. A maltese is best performed between two paralettes that are far apart or between rings, although the maltese is often done on a bar. On a bar you just can’t get between your arms with your body because the bar is in between, it is therefore the art to hang as low as possible just above the bar. In a Maltese, there is a very large force on the chest muscles, shoulders and arms. We recommend that you do not start working with the maltese before you can do the straddle planche.
How to learn a Maltese
To learn a maltese, a good mastery of the planche is the most important basis. A good exercise to start with is pseudo push-ups. In this unique push-up you have turned your hands completely inward, so that you are pointing down with your fingers. By training pseudo push-ups you strengthen your shoulders on the same side as needed for the maltese. Another good exercise is the maltese on forearms. You perform this on top of a bar with your palms facing the floor, trying to push yourself off the bar and hold this position. The maltese on your forearms can also be performed straddle (legs straight and open). You can also lie on your back on the floor with a set of dumbbells in your hands, imitating the position of the Maltese exactly. By increasing the weight in the course of your training, you will eventually have the strength to practice the maltese. The maltese can also be practiced by slowly sinking in from a wide grip planche. To adopt a good form maltese, it is recommended to do this initially with a resistance band around your hip and straddle (legs straightened and open). You can then try the maltese for a number of times per training without resistance band and straddle. Once the straddle maltese succeeds, you can try it with legs closed, also called the full maltese. Here too, it works well to first practice with a resistance band to let your body get used to the posture. Mastering a maltese well can take years, yet many calisthenics athletes have already succeeded and with a lot of motivation, the right environment and perseverance you can also succeed in learning this cool exercise.
Hefesto
A hefesto is also known as a reverse muscle-up. The idea is that from a skin-the-cat (basic exercise) position with a supinated grip (wrists turned inwards) you pull yourself all the way to the top of the bar. The hefesto is a very difficult exercise for advanced calisthenics athletes, which puts a lot of force on your wrists, forearms, biceps, shoulders and chest muscles. Even though the hefesto, like many calisthenics exercises, seems impossible to do, it is possible for every calisthenics athlete to learn it.
How to learn a Hefesto
To learn a hefesto it is best to start with Korean dips. You will perform a dip from sitting on a bar, with your hands in a supinated grip (turned inwards). With Korean dips, you always have to get under the bar with your buttocks, so that your arms are bent to 90 degrees. Then you push yourself back up to the seated position on the bar. Then you can start practicing a negative hefesto. In fact, you do a Korean dip here, only the intention is to lower all the way to the skin-the-cat position (slowly). You can also use a resistance band around your hip, holding the band in place with your hands. A negative hefesto can already be very heavy. Make sure you start carefully and not too fanatically, recover well from the first few times soreness and slowly build up your workouts.
When you succeed in the negative hefesto, you can try to perform the full hefesto with a resistance band around your hip. It’s smart to start from the top since the main focus of the hefesto is your wrists. Try to maintain a false grip (wrist turned upwards) as much as possible when doing the hefesto. The hefesto is one of the most difficult power moves in calisthenics, but with a lot of dedication and training, any calisthenics athlete can learn this cool exercise.
V-sit and I-sit
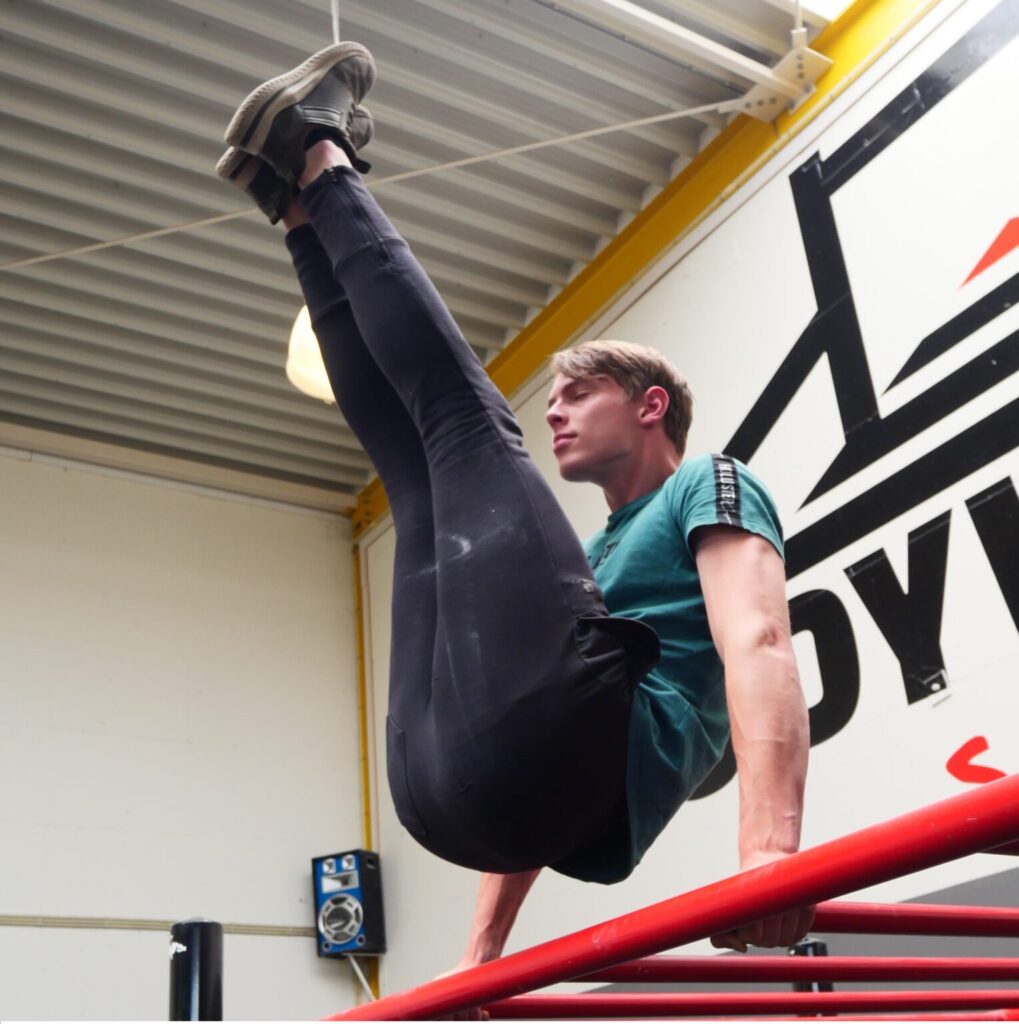
Two advanced variations of the L-sit are the V-sit and the I-sit. The distinctive names describe exactly what position you hold your body in when you perform these. In the V-sit you keep your legs stretched diagonally upwards, imitating the letter V. In the I-sit you keep your legs stretched straight upwards, imitating the letter I (i) as it were. The V-sit and I-sit can be performed on all equipment including the floor, so these versatile exercises are often used in different routines.
How to learn a V-sit and a I-sit
To learn a V-sit and I-sit, you need to do two things: First, the L-sit should be relatively easy for you, and second, you should have a lot of flexibility in your legs. When you already improve these two things it will be possible to do these cool variants. Holding the postures for a longer period of time then becomes the real challenge! To almost fold yourself in half with support and hold it, you need to develop extremely strong abdominal muscles. These must be able to tighten so far that you can hold the V-sit or I-sit. In addition, there is also a lot of weight on your triceps and the back of your shoulders. To train this force, you can already try to lift your knees as high as possible while supporting yourself. Eventually, your legs should be fully extended, as far up as possible to officially do the V-sit or I-sit. These advanced static poses can be learned by anyone. However, the beauty of these poses is that they cannot be achieved with sheer strength, but also require considerable flexibility.
Transitions
Due to the huge number of different exercises in calisthenics, there are still hundreds of times as many different transitions. This is exactly why calisthenics has enough to offer for every type of athlete to be creative in his or her combinations of exercises. Below you will find some of the most famous transitions between exercises which in many cases are a power move. However, transitions can also be made from one element to another or with the help of gravity, so it is often the last exercise in the transition that is made more difficult.
Frog stance to handstand – Transition from a frog stance expressing yourself to a handstand.
Muscle-up to frontlever – Transition from a negative muscle-up where you lie down in the frontlever.
L-sit to handstand – transition from the L-sit or doing a controlled handstand push-up. When performed with straight arms known as Straight-arm press.
Handstand to Planche – Transition from handstand where you slowly lower into a planche with straight arms.
Planche to Handstand – Transition from the planche where you push yourself into a handstand with straight arms. Known as Planche press.
Skin-the-cat to backlever – Transition from the skin-the-cat where you go with a straight body to the backlever (or higher). Known as a backlever raise.
Victorian to Front Lever – Transition from the Victorian where you drop into a front lever.
Handstand to Elbow Lever – Transition from a handstand where you slowly lower into an elbow lever.
Korean dip to backlever – Transition from a korean dip where you slowly lower yourself into a backlever.
Backlever to human-arrow – Transition from a backlever where you put one hand on the ground in a human-arrow.
Victorian (dip bars) to planche – Transition from a Victorian where you can use a swing on your forearms up into a planche.
Basic calisthenics exercises
Would you like to read more about the basic calisthenics exercises? then click the button below!
Freestyle calisthenics exercises
Are you curious about which cool freestyle calisthenics exercises there are? Press below!
Discover more about calisthenics:
